Showing posts with label diy. Show all posts

Monday, June 12, 2017

How to Buy House #2

Step #1: Move your husband, 1.5 year old, and large dog in with your very patient sister and brother-in-law. Promise that it will only be for 4-6 months.


Step #2: Avoid looking at houses for the first 3 months despite your realtor sending you new listings daily. Blame it on the snowy roads. Or having a sick kid. Or just being lazy and wanting to hibernate during the winter, which (spoiler alert) is not possible with a 1.5 year old.

Step #3: Half-heartedly put an offer on a house but get outbid, but realize that you're ready to seriously start house hunting.

Step #4: Look at a few more houses, but finding no contenders, agree to look at a house in the neighborhood where you want to be, but that you've been avoiding looking at because it's out of your price range and the listing pictures make it look... weird.
I know - the front elevation isn't bad looking. It was the rest of the rooms that were... less attractive?

Step #5: Fall in love with the weird house with the wild paint colors that has been on the market for 5 months and that you drove by multiple times during your stay but never thought you'd be interested in.


Step #6: Throw out a low-ball offer and cross your fingers.

Step #7: Purchase house and start planning your lists and lists of updates and DIY projects!

Hope you'll come along for the ride!

Friday, December 12, 2014

Another DIY Project

Our latest DIY project is a little different than a lot of the previous projects around our little house. While I'm still working on finishing caulking the crown molding in the kitchen and planning for a basement revamp, I'm also working on a little side project I affectionately call...


The Nugget.

We had been trying for The Nugget almost exactly two years before we found out we were finally pregnant. It's been a long, sometimes painful, road - so we're over the moon to have conceived naturally and to be expecting a bouncing baby in late May or early June of 2015.

So far things are looking great! We'll be adding "create a nursery" to our project list over the next few months! The crib is already in place - so we're headed in the right direction!

Here are a few "bump" pictures!

8ish weeks

14 weeks pregnant with The Nugget

15 weeks and still running!
Can't wait to meet this little guy or girl in a few more months!

Tuesday, November 4, 2014

Loooooooong Overdue Kitchen Update

Gosh I suck at this sometimes. I definitely enjoy doing the projects more than I do posting about them! That being said - the kitchen still isn't quite finished and we're over a year from the first day of demo. Whoops. Life and things.

We're super close to being done though. I just need to get my butt in gear, and now that it's fall and the mosquitoes have died down and I can spend time outside again without being eaten alive... I'm trying my best to knock this out finally.

I'm skipping a bunch of steps and just going straight to now. Just know that there was a $h!t ton of electrical and plumbing, and cabinet hanging, and drywall skimming, and undercabinet lighting, and backsplash installing, and cabinet building (I built two! By myself! And they work!), and countertop installing (and then reinstalling because the first ones were the wrong size), and floor laying, and, and, and now we're at the final (kinda) step of putting up crown molding!

I made the decision to build the upper cabinets up to the ceiling because it's a small space and I wanted to draw the eyes upwards. I used boards to gain height above the cabinets and now with the addition of a few pieces of crown molding I'm glad I made that decision - it just looks so much more REGAL up in here.


See that open cabinet in the corner? I totes built that sucker.

Maybe one day I'll go back and touch on some of the more specific steps (if anyone is interested - let me know!). In the meantime lets all just step back and bow and/or curtsy in the presence of this crown.

Wednesday, January 29, 2014

Gettin' Hitched - Gettin' Ready

We lucked out with an absolutely beautiful day for our wedding. That's always a worry when you decide to get married outside - but on our day the Northern Michigan weather cooperated (for the most part!).

The wedding and reception all took place that a historic inn right on Hubbard Lake called The Churchill Pointe Inn. We couldn't have asked for a better location, because not only was the wedding on the lawn and the reception in the restaurant, but we also stayed there in one of the rooms upstairs! It doesn't get more all-inclusive than that! My sister and I stayed in the suite the night before - and many of our family members stayed in the other rooms. There are only 8 rooms available - so the rest of the guests stayed in the nearby town of Alpena. But for those of us who got rooms - we were treated to an amazing breakfast the next morning (complete with gluten free french toast - omg! ridiculously delicious!) overlooking the water. 


From there it was just a matter of setting up the restaurant for the reception (which I'll cover in another post!) and then running upstairs to shower and start getting ready!

We all did our own hair and makeup - DIY to the end!

My fabulous book paper bouquet from Momichka on Etsy
 At some point J arrived from the other side of the lake where he had spent the night and started getting ready in a different room of the Inn. I sent him down a card while we were both prepping and in return got a handwritten "Ditto." The man has a way with words - what can I say?


<3 

Apparently it took the girls a little longer to get ready - so the boys went out and took some pictures while the lake was still calm.
Lacing me up took forever - but once we were done we knew it wasn't going anywhere!


The scrunchy nose smile is one of the few traits we share!
And a veil on top to complete the prep.
Mom approves.
And so does Dad.
There are pictures of her from when she was my age - we look SO much alike.

The fam before we became one larger.
Daddy's Girl
This pretty much sums up our relationship.
<3 her always

And then it was time!

Friday, October 4, 2013

Kitchen Renovation, Step #3


Step 3: Sand and Paint Cabinets

Miss Step #1, or #2?

NOTE: this step sucks. And it's boring and kind of lame - so I put sanding and painting together as one step because I can't deny they happened. And I don't have any good pictures because sanding it dirty and painting is messy (at least the way I do it is...). So feel free to skip this one, folks.

a) After letting your preowned kitchen cabinets sit in your garage for 4 months untouched, pick one of the hottest days of the year to start working on them.
NOTE: This has nothing to do with your dad asking you how much you've accomplished since they helped you buy them and haul them back to your garage 4 months ago.

b) Put on pants, a long sleeve shirt, and a hat and then use half a can of bugspray to try to ward off the mosquitoes that accost you as soon as you open the door. Start sweating immediately.

c) Remove all hardware and doors and drawer fronts. Tap into your inner OCD and use a half a box of ziploc bags and permanent marker to sort and label everything since you know your dad will make fun of you mercilessly if you can't remember where everything went like being organized.

d) When removing doors and drawer fronts, if you happen to find a door that has been damaged (e.g. missing an inside corner with a cracked panel) set it aside and ignore it for another month. After your dad gives you a tutorial over the phone, go out and buy a new toy tool to help fix the crack, and skeptically start building up the broken corner with a paste made out of sawdust and wood glue. Don't admit that it works.

e) Using a quarter-sheet orbital sander, start sanding the doors and drawer fronts with 100-grit sandpaper followed by 220-grit. After 4 or 5 days and about 12 doors, get lazy and start on a door with 220-grit first - swear into your dirty dust mask when it works better and then use just 220-grit for the rest.
FUN NOTE: Pretend you're Pig-Pen while running around your driveway slapping at your jeans and shirt trying to get the majority of the dust off before you go inside. 

http://snoopyandthegang.weebly.com/uploads/1/4/0/3/1403090/5656410_orig.jpg
If only the mosquito part were true. via

f) Remember that gorgeous detail on the doors that you fell in love with? You have to sand it all by hand now. You hate it now.
NOTE: Hand sanding results in the sanding of your nails. 

g) After a few weeks of sanding, declare it "done" "good enough" and start vacuuming up the dust and junk that has accumulated on every.surface.of.your.garage. Wipe down the cabinets with a damp rag, and then with deglosser, and then with a tack cloth because you've got some lingering OCD going on.


h) 2 coats of primer plus 2 coats of Benjamin Moore Advance in China White (which requires 16 hours between coats!) is time consuming - but the plus side is that it gives you tons of time to catch up on your podcasts.


Assembly line painting


Thursday, September 12, 2013

How To: Redo Your Dining Room 2 years After You Completely Re-did It...

Step-by-step:

1 - Approximately 1.5 years after completely renovating your dining room and painting it with Martha Stewart's Pumpkin Butter, one hormonal afternoon decide that you hate it. Because it's orange. And orange is limiting when picking out other colors in the house. And it blends in with your floors. And your dog (who also blends in with your floors).

OMG you guys. I legit just realized our living and dining room color scheme was completely based off our dog. Wow. 
You thought I was joking.
anyway...

2 - Over the course of the next 2 months, slowly increase the number of times you criticize the color of your dining room to your husband. Examples may include:
"This room makes me want to eat pumpkin pie."
"Does the dining room look a little poopy in this light?"
"OMG - WHERE IS STELLA?! Oh here she is. She's camouflaged in pumpkin butter."

I couldn't find a actual picture this phenomena - probably because she in blends so well that
I couldn't find her in photos. This is just a gratuitous "isn't my dog adorbz?!" photo.
3 - If your complaining fails to convince your husband to let you start another project, try whining a little.
"But I don't liiiiikkkkkke it."
"Plllllleeeeeeasssssse?"
NOTE: Failing that, just start the project on a Saturday when he's in the lab. So far this method works well for relatively new newlyweds. I'll be sure to report back how this method stands the test of marriage being married to me.

4 - Decide that this project should incorporate the present your dad got you for Christmas - an air compressor. (People who know me and my dad aren't even blinking an eye at this.)
NOTE: Air compressors smoke a lot when you start them for the first time. Something about oil. Always start your new air compressor for the first time outdoors where it can burn off in your kitchen.

5 - Since board and batten requires a lot of nails and patience (one of which you don't have, the other which you can buy) - go with that. Draw a picture to help you figure out how much lumber you need. Make sure that you won't be able to decipher what the hell you were doing when you look at it again 2 months later.
Note me calling our dog walker by the wrong name in the corner. Fail.
6 - Because of a super duper long line at the paint counter at HD and your impressive lack amount of patience, paint the bottom third of your dining room Behr white. Not the fancy white you had picked out - just plain ol' off-the-shelf white.
Oooo look at that nice view of that wood paneling and green laminate. 
7 - While attaching the horizontal boards, if you happen to find yourself with an incredibly curvaceous wall, throw all of your weight into the board to try to get it to bend to the shape of the wall. Heck - hit it with a hammer a few times to see if you can persuade it. When you start to feel the drywall give way, hit it one more time before giving up. Then go back to HD and pick up a fake board made out of PVC that is bendy. Attach it and hope no one notices your outrageously curvy wall.


8 - Place and attach vertical slats. Then stop for a week to annoy your husband pick the perfect paint color.
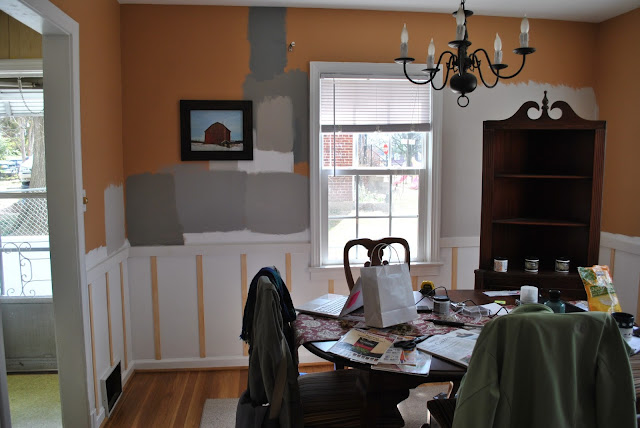
As with whites, who knew there were so many... gray shades? Notice how I avoided that so smoothly? 
9 - After deliberating for a week over different grays, choose the same gray as you already have in your hallway. Because you're exciting and risky like that. 


10 - (Optional step) Hang up white curtains. Tape a blue paint chip on one because you envision painting stripes on them. Leave it there for 3 months and then start a new project (i.e. a full kitchen remodel).


Just for fun here's a real "before" picture!

Oye.
Feel free to OOO and AHH with me.