Showing posts with label first time home owner. Show all posts

Wednesday, November 20, 2013

Kitchen Renovation, Step #4

Step 4: Recruit Help. Demolish Kitchen and Install New Bathroom Floor

Miss Steps #1, #2, or #3?

a) Recruit help. Preferably help that can do electrical and plumbing.
NOTE: This step is probably best done right after your Dad retires and has lots of "free time" on his hands.
NOTE x2: This may take some bribery on your part - unless you're my parents, who think that spending two weeks gutting and rebuilding our kitchen sounds "fun" and your mom even describes it as sounding "spa-like" (I'm not even joking). 

b) Convince your parents help that they should come and visit for two weeks for an intensive kitchen remodel. When they agree have a minor panic attack and start sanding and painting kitchen cabinets like a maniac and tearing down paneling like it's your job.

c) When they arrive, panic again when your dad decides the best way to tap in the new drain line to the kitchen sink is to completely take out your old, iron, rusty, painted-over-8-times sewer line and replace it with shiny PVC...

I call this "The Thinkers"
... but perk up dramatically when you realize that the fact that your toilet has to come out during the sewer line replacement means you can replace you bathroom floor!

This is what I did while the boys broke iron sewer pipes downstairs, while swearing.
The before tile is more awful than this picture shows. Missing grout and loose tiles.
 d) Once the sewer line is back in place, commence kitchen demolition. Tear out kitchen cabinets and knock down walls to the studs.

Take no prisoners.
Look at all that yummy insulation that fell in my hair and down my shirt and in my shoes and...
So long weird wall.
e) Rest. Watch a football game. And ogle over your new bathroom floor since your kitchen is completely demolished and you can't envision it ever going back together. Ever.

Another opportunity for you to ooo and ahh with me. Don't judge my lack of white balance.

For reference, this is where we left it:


Improvement?


Tuesday, September 3, 2013

Kitchen Renovation, Step #1

Step 1: Purchase Cabinets


Step-by-step

1a) While touring your favorite used home improvement store with your parents decide that a used set of kitchen cabinets for sale might work in your kitchen and would save you at least $4,000 over new Ikea cabinets.
1b) Take a ton of pictures and measurements of said cabinets to take back and convince your hubby to allow you to spend your tax return on them.


1c) Back at your house, while your parents measure out your kitchen, try to convince your husband to let you go back and buy the cabinets today because your parents and their minivan are leaving in a few hours. NOTE: If your husband makes you promise that the cabinets won't take up the whole garage, smile sweetly and promise that they absolutely will not take up the entire garage.

1d) Return to your favorite used home improvement store to purchase cabinets approximately 25 min before they close and about 3 hours before your parents are scheduled to leave. With the cabinets in the back of the store, this leaves you with enough time to make approximately 2.5 trips to the minivan before the store starts turning off the lights on you. At this point, play up the sympathy vote. If you're lucky, an employee at the store who happens to own a truck may offer to haul the rest of the cabinets home for you for $10. Agree before he can finish offering and then give him $20. NOTE: Try not to cry tears of relief. That will only make things awkward.

1e) Once all of the cabinets are unloaded on your front lawn, carry them back into the garage - filling it entirely. 


1f) Hug parents goodbye, apologize to husband, then quietly do victory dance in your now very-limited garage space.

Sunday, February 3, 2013

Project: Hallway Over-Hall, Part 1

This is one of those projects that started because of another project, during which I got distracted and started working on something else - and now this project is finished and the one that I started is still sitting in the garage... sound familiar?

At least both projects are in the hallway. Our weird, little hallway. It's just a really small space in which six different doors/entryways intersect. Clockwise, we have: the entryway from the living room, a closet with a folding door, the door to the guest room, the door to the bathroom, another closet door, and then the door that heads upstairs.  Originally there was actually another door in there too (from when the living room was another bedroom - you can read more about that here), and that may explain why the door that heads upstairs currently swings out into the hallway. And while that may have used to make sense, now it's just an annoying problem.


Friday, September 14, 2012

Red Door, Blue Door, Front Door, Screen Door

It's been mentioned in past posts (here and here) that I have major problems making a decision on paint colors. Let's call it paint paralysis. Well I'm suffering from it yet again. Thanks to Kat over at Maple Leaves & Sycamore Trees, I've got the front door painting bug. BUT, yet again, I'm struggling to pick a paint color. And instead of the normal problem of trying to decide between 8 different shades of green, this time I'm having trouble narrowing it down from... um... every color.

Mostly I blame the current problem on the previous owners and their paint choice. Truthfully I've always drooled over those pictures of cute cape cod houses with grey cedar shingle siding - and I got halfway there with our first house... kind of.  It's a cute little cape cod and it has grey-blue siding... let's stop there. 

That grey-blue siding is my current hold-up. I wish it were more grey. Or more blue. Or darker. Or... just something... more.  Instead it's caught between grey and blue and it's restricting the creative side of my brain from choosing a color for our completely bland front door. 

So - that's why I'm here. Begging for your opinion.  Please.Help.Me.  

Thursday, May 24, 2012

Project: Backyard Beautification, Part 1

We got a new fence! Whoot! No more staring at our neighbors junk pile. No more worrying that the dog is going to jump the extremely low chain-link fence. No more accidentally busting through the rotted privacy fence.

Here are a couple before shots for your viewing pleasure:
Our teeny tiny chain-link fence. The top of Stella's head was even with the top of the fence. 
The chain link was short enough that I could step over it (I'm 5'5) - so that should tell you something. And it was short enough that Stella made a run for it once a few months after we moved in (though she hadn't made another escape attempt since - maybe the first one was traumatizing?).  And because it was so short, and she had made one escape back in October, we were both pretty paranoid about leaving her out there by herself for too long without checking to make sure she was still back there every 10 minutes. So not relaxing for us, and probably annoying to her since if she had it her way she'd chill there all day without our anxious faces pressing up against the windows every 10 minutes - or, sometimes,  if she happened to wedge herself along the house, running out into the back yard frantically to make sure the big gold mutt is still contained. Again - I think we found this more stress-inducing than she did.

Also - it doesn't show in this picture, but we didn't have a driveway gate.  That meant when we let Stella out the side door, she was temporarily free to take off on us when we walked her around to the back gate to let her into the backyard. She was actually pretty good about sticking right with us whenever we let her in or our - except the couple of times she wasn't... all of which involved J. Poor guy. Once as he was bringing her around from the back to bring her inside, a guy wheeled by on his bicycle with his German Shepard trotting beside him. Stella, of course, was gone like a lightning bolt and that poor guy almost face planted off his bike. Another time when J was bringing Stella around to the side door there was a woman walking her dog down the sidewalk - and Stella took off to smell her dog. That woman screamed bloody murder when she saw Stella coming at her. I can't blame her though - Stella's pretty big!

Anyway - that explains our need to replace the chain-link portion of the fence. Now - on to the privacy fence.
Note the junk pile to the left and the strange lanterns and sword attached to the privacy fence. 
I should have taken a closer picture of this white picket disaster before it got torn down.  What you can't really see in this picture is that 5 or 6 of the tops of the pickets are completely broken off. They were so rotted through that when we were trying to fix the fence after it fell down in Hurricane Irene (that's a whole other story!) we kept busting them off.  Then there is the separate matter of the 18" gap that ran along the bottom. And the fact that the previous owners thought they would add some random old lanterns (yes - electric, but they're not wired now) - AND those lanterns aren't even even. Seriously. Then - lastly, there is the neighbor's junk pile. We like our neighbors - just not their junk. It was a bit of an eyesore and we were excited to potentially hide it!

We thought about DIYing this project too... but after weighing the pros and cons (pros being price, cons being time, inexperience, and the fact I just didn't want to), we decided to hire this one out. The biggest plus to having someone else do it was it would be done in one day and they would haul the old fence away! BIG plus since we just have a little Saturn Ion for hauling stuff. AND if we had done this ourselves it probably would have taken us 4 weekends or something ridiculous like that - during which Stella couldn't chill outside like she loves, and we really couldn't sit out there and enjoy ourselves either with a partially done project.

So we called around for a couple of estimates, picked one, and scheduled the project date. On Monday, our scheduled project day, it was pouring when I left for work. We weren't sure whether they would able to work in the rain, but later on I got a text from J saying the workers were there and demoing the old fence! I asked him to take pictures of the progress... this is what I got:

I think he was impressed with Hercules over there who is lifting a huge hunk of concrete over his head. Seriously, I'm impressed too because I could only pry them up with a shovel.
We were quoted for a full one-day project, but that one day project ended up turning into 1.5 for two reasons.
1) The guys told us they had never seen anything like our chain link fence.  It was buried deeper than usual - including the chain link part itself. Then the posts were so deep that they decided to cut them off below ground level - but they kept eating the sawzall blades! One post took three blades to cut through!
2) We had baby robins in the rose bush and the rose bush had branches growing through the old fence. J asked them to be careful - and boy were they! It was so cute to see these two huge burly guys trying to gently push the new post into place without disrupting this nest with four baby robins in it.
It ended up that they stayed at the house working until 8:30 p.m. on Monday night and then showing up again at 6 a.m. Tuesday morning. But ultimately, they declared it finished!

And... TA DA!

A more Stella-proof chain-link fence height that should give us more piece of mind.

The new cedar privacy fence. And, yes. It does smell like cedar... fantastic!
Oh - and here is a shot of the new driveway gate! I don't have a before shot. Just picture this same scene without the gate...  ;)
And - as always, the before-and-afters!

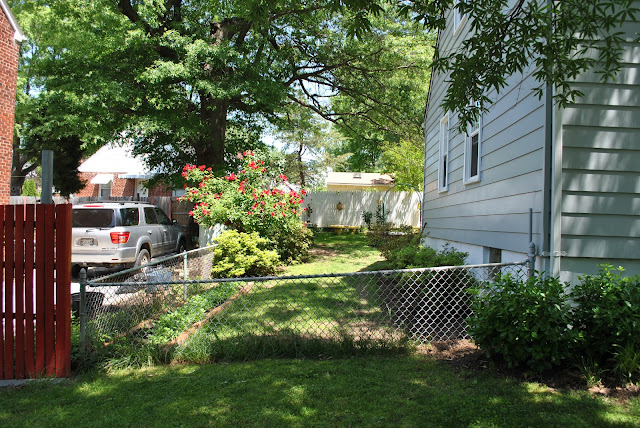
I should have had J stand next to the fence for the before shot too. But if you look at where the top of the fence hits the neighbors red fence or hits the siding on our house, you get a sense of how much higher it is.

Goodbye junk pile and rotten white picket fence! Hellllllllooooo red cedar and a little actual privacy!
Next up? We seriously need to demo that concrete thing in the middle of the yard. Oh - and build a patio. And a pergola. And. And. And. :)


Sunday, May 20, 2012

Project: Buffet Breakthrough

I've been really picky about choosing a buffet for our entryway. Like, really picky... as in - we've lived here for a year and I'm still searching Craigslist every day for a buffet - picky.  But, I am happy and relieved to announce - we finally have a winner!

First the backstory... There isn't really an entryway in our house. Instead, when you open the front door, you walk straight into the great, wide space that houses our living room and dining room. There isn't a closet (that is back in the hallway), and there isn't really a spot for shoes... so defining this space has been extremely challenging.

Once both rooms were painted and the archway was built last summer, I began struggling with what to do with the great expanse of wall that we stare at when we walk in.  At some point last summer, I decided I wanted to put a big buffet there - one with the long legs (I think the style is 'federal'?) so that we could still show off the hardwood floors.  So pretty much every day since then, I hunted Craigslist.  And hunted. And hunted. And hunted. I found a few that fit my vision - but then they didn't fit the measurement requirements, or, more commonly my budgetary restrictions!  So I kept hunting.

Saturday, April 28, 2012

Project: Guest Room Revamp

My latest big project was brought on by the imminent arrival of three weekends of company, back-to-back.  Of course, the one room that we really hadn't touched since moving in happened to be the guest room.  So the weekend after I finished the big stair project, with two weekends before the arrival of our first weekend of company, I decided to tackle what used to be the master bedroom (when the old owners were here).  

You may be thinking, "I'm sure it was fine and your awesome family that was visiting wouldn't have minded a bit if you hadn't revamped it before they got there." (So maybe that isn't verbatim what you're thinking, but it's probably along those lines, right?) Anyway, let me tell you - it was not fine.  First off, it had been painted the same boring beige prior to it going on the market. No biggie, right? Boring colors aren't the end of the world (nothing against those of you who willingly choose beige as a paint color... ahem).  Second, this guy really, really liked paneling (more evidence here, and here) - you'll see in the pictures below that he managed to build even more window boxes made of paneling. THEN - not only are there window boxes made of paneling in the room, but the contractor who painted the room prior to us buying it, reinstalled the window boxes upside down! So now we have upside-down window boxes made of paneling. Le' sigh.  And, if that wasn't bad enough, we had the itty-bitty-teensy-weensy problem of the paint actively peeling itself off the wall.  Yes - without my help there were actually two spots that had peeled down to the original drywall.

Thursday, March 29, 2012

Project: New Life for an Old Dining Room Table

When we bought this house, I was probably just as excited by the prospect of having a garage as I was about having a house.  And boy did we get a garage! The footprint of our garage is actually only one foot less wide than the house footprint - yet it's only a one-car garage, meaning a LOT of extra space available for hobbies!

Back story: A few years ago my dad and I saved an end table from a certain future in a landfill by plucking it out of our neighbors scraps after a garage sale.  It was in sorry shape. The veneer had peeled off part of the top and it was terribly water-stained due to sitting outside for who knows how long... but with some sanding and some wood glue and a lot of elbow grease and patience, we saved it - and now it sits prominently in our living room.

She's much to pretty for a landfill.
Ever since then I've had a nagging urge to refinish wood furniture - but I've never had the space to give it a shot (that's a partial lie - I've had the space, just not the ventilation or the 'ok' from roomies!), so when we bought the house and all of the sudden I had all this space in the garage, I decided that it was time for me to give it a shot on my own.  So, what did I start with? Something simple like another little end table or possibly a cute little jewelry box from the thrift store? NO WAY - I went big and bought a pretty sad looking table and chairs off of Craigslist.  :)

Thursday, March 22, 2012

Project: Stairway to...

I was going to title this post "Project: Stairway to Heaven Our Bedroom" but then I decided that was maybe a little weird.

ANYWAY - As I've mentioned before, one of the first projects that we took on after we bought this house was ripping out all of the carpet and redoing the floors.  Most of the time we were giddy with excitement at how beautiful the floors were underneath the carpet... until we got to the stairs.  As you can see below, the stair reveal was a major disappointment.

Saturday, March 3, 2012

Project: Living Room Fast Forward

I figured since the last post focused on the dining room, that I should do a 180 and focus on the other half of our large front room area - the living room!  I do have a proper "before" shot for this one. Note the window boxes - also made from paneling! This guy LOVED paneling!

Note the high-traffic area from the previous owners?
One of the projects that I didn't mention in the last post was the floor.  When we moved in, the entire house was carpeted. Actually, every room (besides the kitchen and bathroom) was carpeted in the same carpet.

Friday, March 2, 2012

Project: Dining Room Fast Forward

I haven't posted in a long time - probably because we've been so busy working on the house and planning a wedding... and probably a little bit because I'm not a very committed blogger.  I'll have to work on that.

This post is dedicated to updating the progress we've made on the dining room.  Sadly, I don't have a nice "before" picture from the living room perspective.  Probably because it was so awful. Seriously - awful.  The living and dining area is one big, long room, and the previous owners made the distinction between the two areas by putting up dark wood paneling on the walls in the dining area, and lighter wood paneling on the ceiling.  And, come to find out, those pretty beams that you see in the next picture are also just pieces of paneling. Yeesh.   This was the very first project that we took on as new homeowners.

Tuesday, October 11, 2011

Project: Dining Room Ceiling/Mold sucks

So in my last post I talked about tearing down the paneling that was so liberally applied in our living and dining room areas.  Sadly, when we tore it down we discovered why paneling was so popular in the first place - it certainly covers up the drywall problems! One of the major problems that we discovered was mold. Yuck!


There was obviously a time when there had been some water leakage - thankfully the previous owners had had a new roof put on before they put it up for sale, so wherever the leak was, it should be fixed by now.

Unfortunately - we still had mold. And severe drywall damage in that area.  Ew.

Thursday, September 29, 2011

Project: That Paneling has GOT to go.

As soon as the keys to this baby were in our hands, the first order of business was to get that particularly awful paneling off the walls and ceiling in the living room and dining room (well actually the first order of business was to move in, but that would make for a boring blog post... kind of. Move-in actually happened during a rainstorm!).

Back in the day the original owners tore down a wall to a front bedroom and created one large room for the living and dining areas.  In order to differentiate between the living area and the dining area, they apparently decided that sticking some dark wood paneling up to create that divide... which left us with one long room with a seemingly random application of paneling at one end which you would be able to see here if we hadn't been so gung-ho to get started and actually taken a before shot. Whoops.  Here is another shot of the ceiling paneling for your viewing pleasure instead:
Sweet chandelier too, right?

And a shot of the random wall of paneling in the living room. I'm guessing they thought it would balance the space out? Or maybe they were just hoping it would?

The window boxes are also made out of... wait for it... paneling!

Yep. You can probably see the problem here.  So J and I went to town thinking all we would need to do is pop a few small nails, peel that paneling away, repaint, and voila new dining room and living room!  Easy peesy, right?

Wednesday, September 28, 2011

Homeowner Extraordinaires

We're completely consumed with making improvements to the new house. No seriously. More posts on the projects to come, but before we can do that - I have to present the before pictures. Just know that while these are scary - there was a lot of potential under all that carpet and paneling!
Living room - before
Turn around from the living room and you're staring at the dining room. All paneled. Even the ceiling. Yeesh.

Kitchen - like the dark, shiny cabinets? Yeah, me neither.
More kitchen before. This gives you a great view of the floor.  Installed back when lime green laminate was considered a "good" idea.


The shining star in the basement! Yes - that is a Zenith TV in the wall! Sweet!

The one and only bathroom. There are swans on those glass doors. We're all about the classy here.
The rest of the itty, bitty, teeny-weeny bathroom.

The soon-to-be Master Bedroom.
So now that you've seen some of the before pictures you'll be able to appreciate the "in progress" and "after" posts a little more!